Patches of the East Coast are buzzing with the return of the 17-year cicadas. They're carpeting spots from GA to CT, and filling the air with a 7 kHz mating buzz. Alert scientists when you see them emerge — or help predict their arrival with a home-built sensor!
Hover over the dots for details.-
From Georgia to Connecticut, baby magicicadas, or "nymphs," have been sleeping and feeding on the juice of tree roots underground for 17 years. They emerge when the soil temperature reaches a steady 64° F.
-
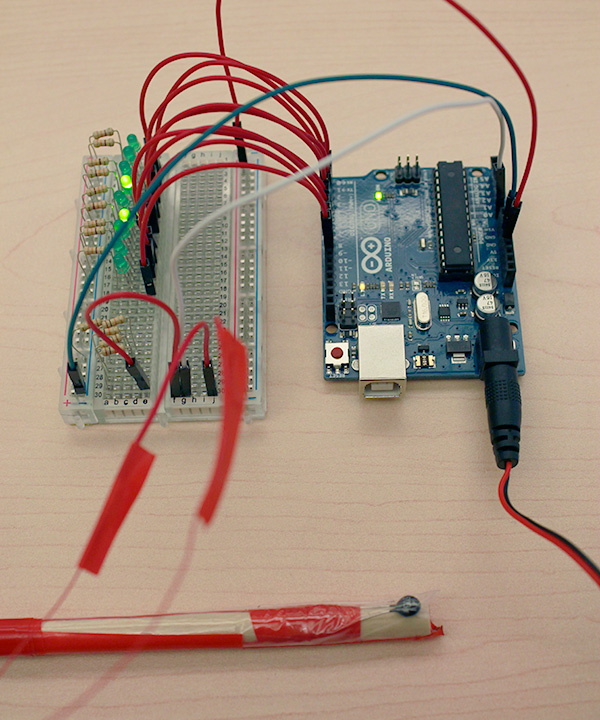
Build a detector to monitor the soil 8" down. . .
-
. . . and use the nine LEDs on the detector to report your temperature to Radiolab. A steady 64° F indicates the cicadas should arrive!
-
A week after emerging from underground, the male magicicada begins its mating call. The female magicicada responds by flicking its wings. A mating ritual ensues to spawn the next brood of magicicada!
-
You can hear the magicicada's call. You won't miss it!
-
Once they have emerged, it takes about a week for magicicadas to shed their final "skin" and reach adulthood.
Map
See Cicadas?
When you see or hear cicadas emerge, we want to hear about it — and so do bug scientsts! Fill out the report form, and we'll send your data to research scientist John Cooley and professor Chris Simon at the University of Connecticut Ecology & Evolutionary Biology department. They're tracking this once-in-a-17-year event for science.
Bug Blog
Build Your Own Sensor
Magicicada Brood II will make its 17-year appearance when the ground 8" down is a steady 64° F. Help predict the arrival by planting a homemade temperature sensor in the ground and reporting your findings back to to Radiolab. We'll put them on a map and share your observations with the world.
The whole detector costs about $80 in parts and takes about 2 hours to build. You'll want it in the ground by mid-April, the earliest the cicadas are likely to emerge.
You can also participate — and save money — by buying a soil thermometer that will detect the temperature 8 inches underground, such as this one that costs less than $8. If you've got other creative ways to build or buy a detector, let us know!
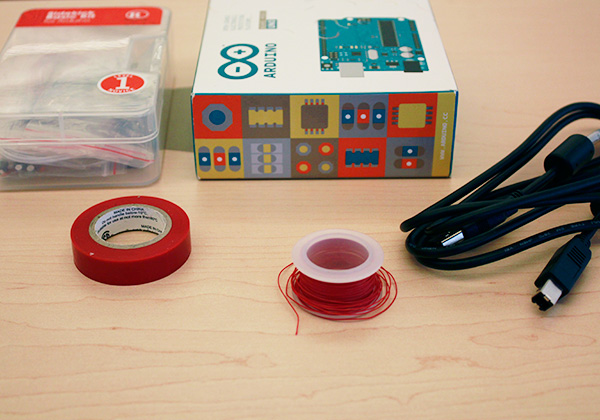
Parts List
- An Arduino Uno, available from Adafruit, Sparkfun or RadioShack. (The Arduino Due, Mega and Leonardo models also should work.)
- A SideKick Basic Kit for Arduino from RadioShack. From this kit, we use the following items, which you can also buy separately:
- Breadboard
- Thermistor
- 9 LEDs (2 legged, any color)
- 9 - 330-ohm resistors
- 5 - 10K-ohm resistors
- 11 short jumper cables
- 4 longer jumper cables
- Wrapping wire
- USB A-B cable
- Electrical tape
- Plastic baggie
- 12-inch long wooden dowel
- Scissors
- A laptop computer to configure the Arduino and power it when you take a reading. You can also power Ardiuno with a 9V battery and this connector.
Finished Detector
- diagram
- Photo
Assembly Guide
Prep
- 01
- 02
- 03
Assemble
- 04
- 05
- 06
- 07
- 08
- 09
- 10
- 11
- 12
- 13
- 14
- 15
- 16
- 17
- 18
- 19
- 20
- 21
- 22
- 23
Code and Deploy
- 24
- 25
- 26
- 27
- 28
Take Readings
- 29
Step
Decode Temperatures
To decode the temperature, click on the green buttons so they match your detector's LED pattern:
Built by Adam DePrince, Steven Melendez, Louise Ma and John Keefe / WNYC.
Feedback
Radiolab is supported, in part, by the National Science Foundation.